Installing or replacing an SSL certificate
This guide provides step-by-step instructions on how to set up or replace an SSL certificate in the Web Panel or in Plesk for your website on Windows and Linux – using both Let's Encrypt and a Positive SSL certificate.
Prerequisites
- Access to the centron Control Panel
Installing or replacing an SSL certificate (Web Panel – Windows)
If you have a multi-domain or wildcard certificate that needs replacing, please contact technical support. These certificates cannot be replaced via the Web Panel.
1. Accessing the web panel (Windows)
1.1. Logging in
To replace the certificate, please log in to our web panel.
Info: Der Benutzername ist hier Ihre Kundennummer.
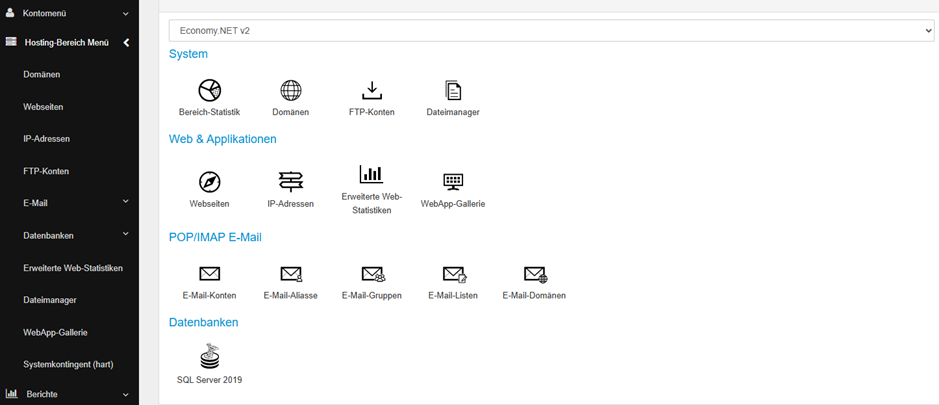
Once you have logged in, the user interface should appear as usual.
If you cannot see a hosting package, click on the ‘Hosting Area Menu’ menu item in the left-hand column (see image).
There you will find the ‘Websites’ tab, which you can use to manage your domain and change certificates.
1.2 Select a website
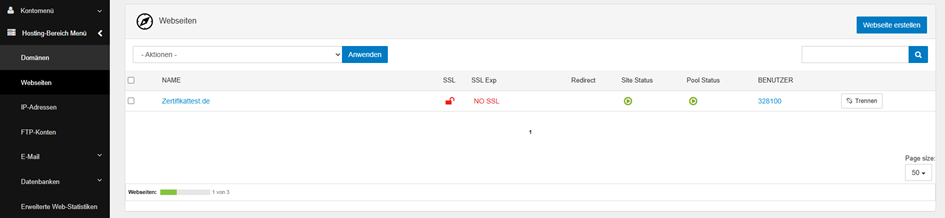
In the “Websites” section, you will see an overview of all the domains you have set up (see example image). Click on the website for which you wish to install or update a certificate.
1.3 Checking website pointers
Before installing a certificate, please check whether so-called website pointers are being used. A distinction must be made here:
-
Only temporary centron domains are included
→ You can skip this step. -
Integrated domains
→ Please read the following “Info” carefully, as further steps are required.
If you have added further domains in the ‘Website Pointers’ section (top right), please contact technical support before replacing the certificate.
Reason: When replacing a certificate that covers multiple domains in the website pointer, important bindings may be automatically removed and not correctly re-established. This can lead to malfunctions or a complete failure of the website.
2. Setting up a Let's Encrypt certificate
2.1. Enabling SSL
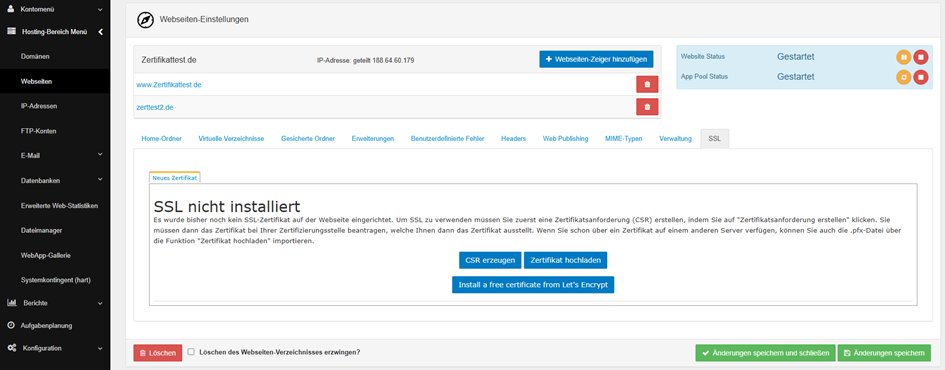
- Go to the “SSL” tab (on the right-hand side of the page, see image)
- Click on: “Install a free certificate from Let's Encrypt”
2.2. Selecting domains
- In the bottom left-hand corner, you will see your website’s subdomain, e.g.
www.zertifikattest.de - To the right of this, you will see the linked domains from the website pointers
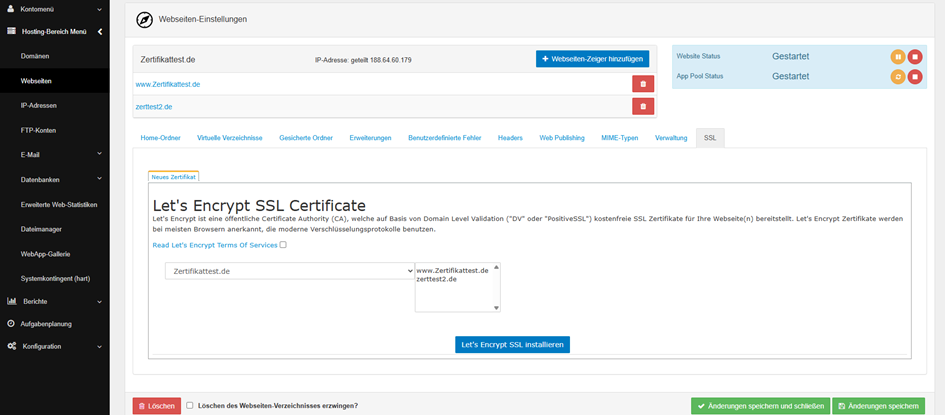
Hold down the Shift key and select all the domains that are to have SSL. Domains that are not selected will not be included in the certificate.
2.3. Confirmation & Installation
- Read through the “General Terms and Conditions”
- Tick the box next to “Read Let’s Encrypt Terms of Service”
- Then click on “Install Let’s Encrypt SSL”
If all the steps have been carried out correctly, the certificate should have been installed successfully.
Bei Fehlermeldungen wenden Sie sich bitte an den technischen Support.
Setting up a Positive SSL certificate
3.1. Downloading the certificate from ccenter
- Log in to ccenter using your login details.
- Navigate to the “SSL Manager” section.
- Select the SSL certificate that was created for your website.
- Download the file in
.pfxformat:
- Make sure you choose a strong password.
- Make a note of this password or copy it down somewhere safe.
3.2. Uploading a certificate in the web panel
- Open your website in the web panel again (as in section 1).
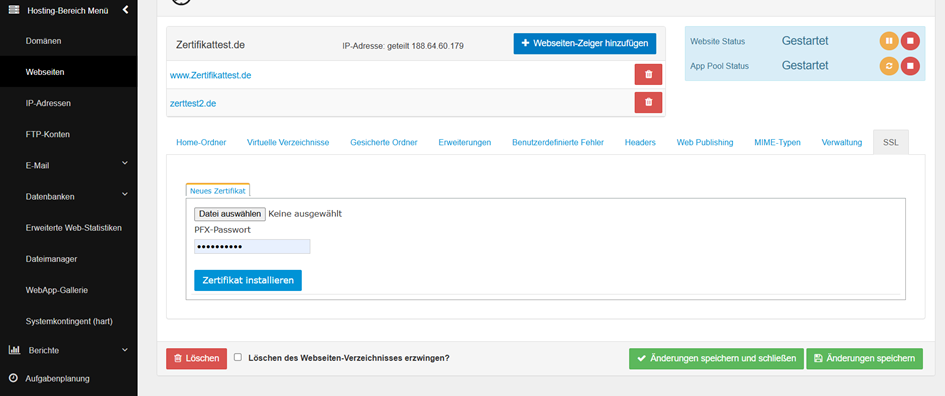
- Go to the ‘SSL’ tab.
- Delete the old certificate to avoid any potential errors.
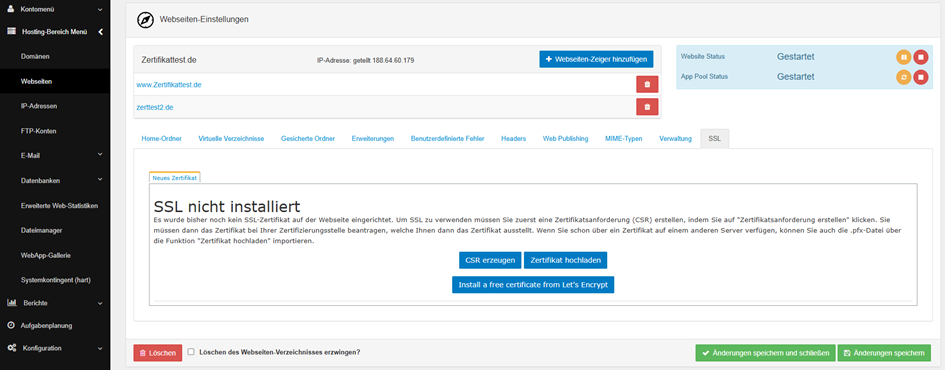
- Click on ‘Upload certificate’ (see image).
3.3. Select file & install
- Click on ‘Select file’ and upload your .pfx file.
- Enter the password you set earlier.
- Confirm the process.
The certificate will now be installed on your website.
3.4. Checking the installation
- Open your website in your browser.
- Click on the padlock icon in the address bar at the top left.
- Select: “Connection is secure” → “Certificate is valid”.
If the old certificate is still being displayed, this is often due to the browser cache. If necessary, open the page in incognito mode or clear the cache.
3.5. Checking the certificate externally
For a reliable check, we recommend the free SSL Checker: SSLtrust Check
- Enter your domain there
You will be provided with a detailed overview of the current certificate (e.g. its validity).
Installing or replacing an SSL certificate (Plesk – Linux)
This guide explains how to set up or replace an SSL certificate in Plesk for your website – using either a free Let’s Encrypt certificate or a Positive SSL certificate from centron ccenter.
1. Logging in to Plesk
Log in to your Plesk environment. There are several URLs available here.
https://mhweb-bbg-XX.internet1.de:8443/
https://vs12600.internet1.de:8443/
https://vs12601.internet1.de:8443/
https://vs12974.internet1.de:8443/
Replace XX with the server number or use the URL you received from us.
Select a website & open the certificate section
Once you have logged in, you will see your website(s) straight away. If not, click on the domain you require.
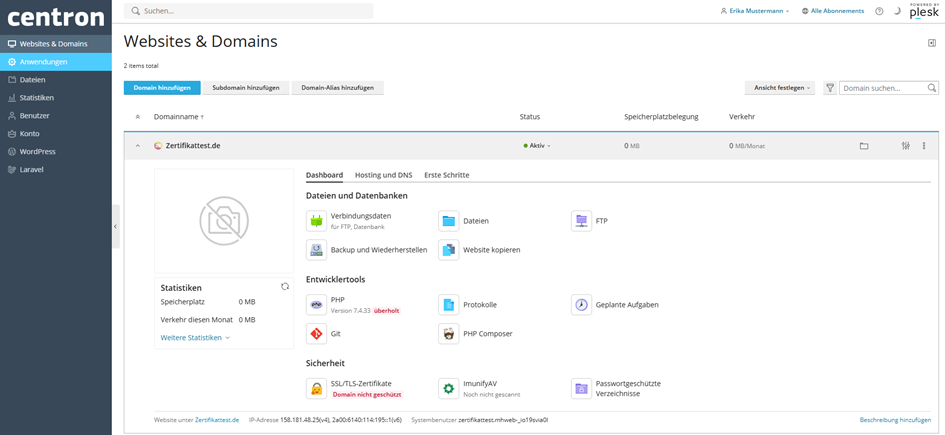
- Scroll down to the ‘Security’ section
- Click on ‘SSL/TLS certificates’
1. Setting up a Let’s Encrypt certificate
1.1. Applying for a certificate
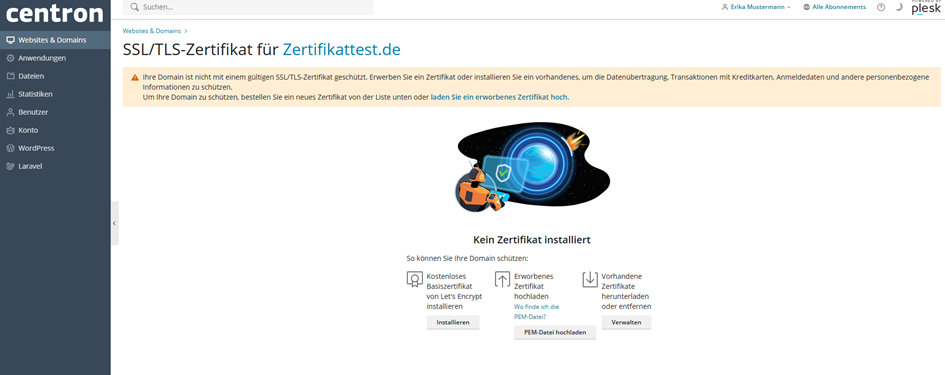
In the SSL overview, you may see a message stating that your website is not secure if a certificate has not yet been set up.
The display may differ slightly if a certificate is already installed.
- Click on the ‘Install free base certificate from Let's Encrypt’ button (bottom left/centre)
1.2. Selecting & installing options
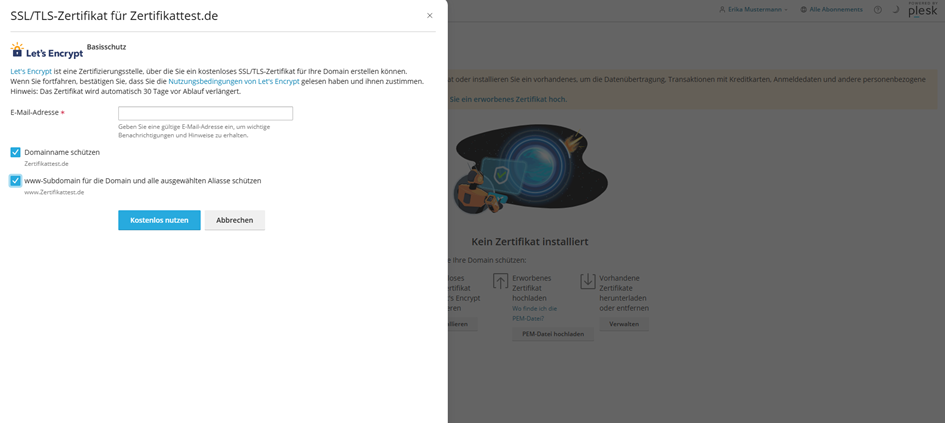
A new window opens:
- Select whether the subdomain “
www.” should also be protected. - Enter a valid email address.
- Then click on “Use for free”.
Voraussetzung: Die DNS-Einträge müssen korrekt gesetzt sein.
If everything has been set up correctly, the certificate will be installed automatically.
If a customer visits your site via www.ihre-domain.de and this subdomain is not included in the certificate, an error message will be displayed (‘This site is not secure’).
It is therefore best to always tick the box next to ‘www’.
2. Setting up a positive, multi-domain or wildcard SSL certificate
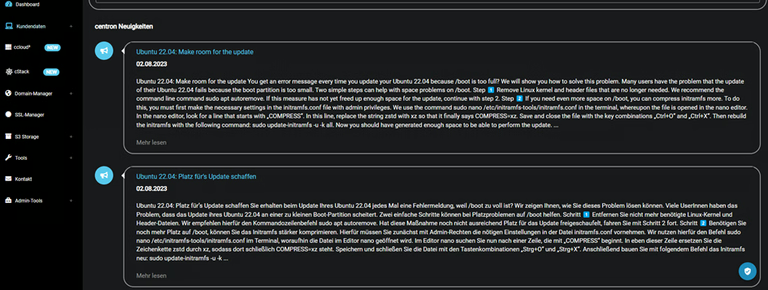
2.1. Downloading certificate files in ccenter
- Log in to centron ccenter:
https://ccenter.centron.de/ - Navigate to the “SSL Manager”.
- Select the certificate that was created for your website.
- Download the following three files:
.key.crt.ca-bundle
2.2. Uploading a certificate to Plesk
Note regarding multi-domain or wildcard certificates The certificate must be uploaded separately for each subdomain or additional domain.
This applies in particular to scenarios involving multiple domains or subdomains within a single web hosting package.
- Open your website again in the Plesk panel (as described in the second section).
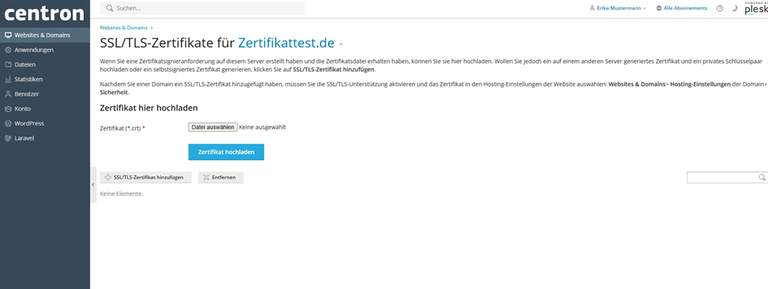
- The screen may look slightly different if a certificate is already installed (see image).
- Click on “Upload or remove existing certificates”.
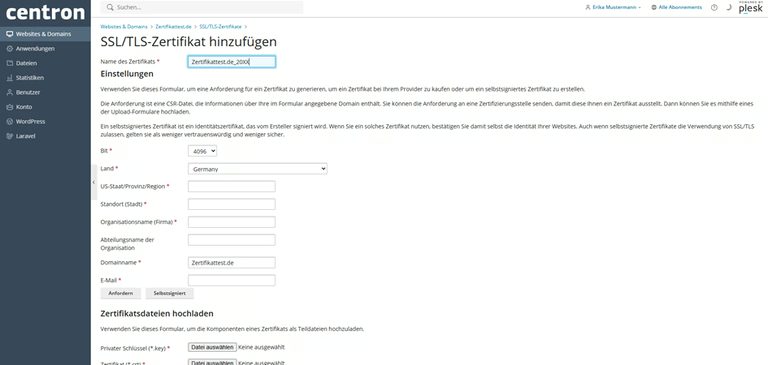
- Click on “Add SSL/TLS certificate”.
2.3. Enter certificate details
- Give the certificate a name, e.g. my-domain.de_2025
- It is best to use the domain name followed by the year in which it was renewed
- Fill in all mandatory fields (marked with an asterisk *)
- Scroll down to the upload section
2.4. Uploading certificate files
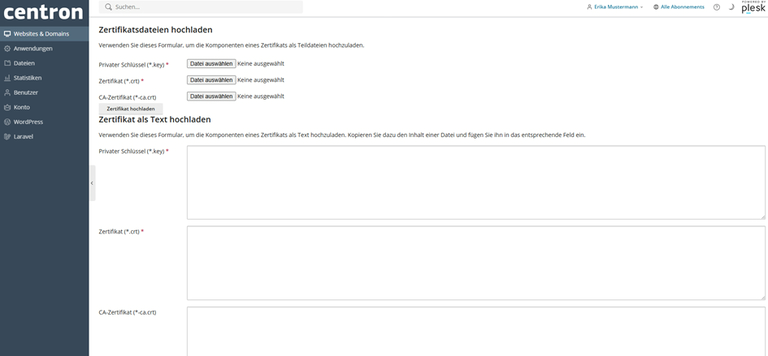
- Select the three files you downloaded earlier (.key, .crt, .ca-bundle)
- Ensure the correct mapping (shown in brackets after each field)
- Click on “Upload certificate”
2.5. Activating the certificate on the website
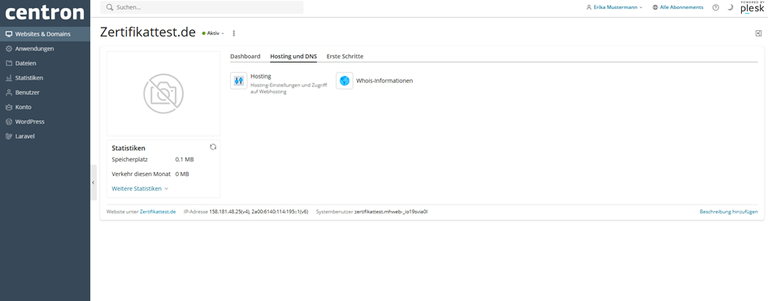
- Go back to your website in the top right-hand corner (blue link).
- Click on ‘Hosting and DNS’ → ‘Hosting’ in the centre.
- Scroll down to the “Certificate” section.
→ This may say “Not selected”, or show a different certificate if one has already been integrated here. - Open the drop-down menu and select the newly uploaded certificate.
- Click on “Save”.
2.6. Checking the installation
- Open your website in your browser.
- Click on the padlock icon in the address bar at the top left.
- Select: ‘Connection is secure’ → ‘Certificate is valid’.
- If the new certificate is displayed here, all you need to do is delete the old certificate (see 4.8).
- If the new certificate is not displayed, proceed to step 4.7.
If the old certificate is still being displayed, this is often due to the browser cache. If necessary, open the page in incognito mode or clear the cache.
2.7. Checking a certificate externally
For a reliable check, we recommend the free SSL Checker:
SSLtrust Check
- Enter your domain there
You will be provided with a detailed overview of the current certificate (e.g. its validity).
2.8. Deleting an old certificate
- Go back to your dashboard.
- Scroll down and click on “SSL/TLS certificates”.
- Select “Advanced settings” at the top centre.
- You will now see an overview of your existing certificates.
- Select the old certificate.
- Check to the right of the green arrow to see if a “0” is displayed there:
0 = Das Zertifikat wird aktuell von keinem Dienst mehr verwendet
≠0 = Das Zertifikat ist noch aktiv im Einsatz (z. B. „1“ oder mehr)
Only delete the old certificate if all your websites have already been switched over to the new certificates and a “0” is displayed next to the old certificate.