Create and manage virtual machines
In this guide, you create a virtual machine (VM) in the ccloud³ interface and learn how to start, stop, reset and destroy it.
The user who creates the server has full root or administrator rights. Once set up, a server keeps all of its settings (resources, drive assignment, password, IP address etc.), even after a restart at operating system level.
An exception applies if Premium Full Managing is enabled. In this case, root and administrator rights remain with centron to ensure a consistent quality standard. For more information, see Premium Full Managing.
A server is only removed from your server overview once you destroy it permanently. For more information, see the ccloud³ overview.
Prerequisites
- Access to the ccloud³ interface
- Free resources in your quota (shown under Manage → Kontingente (quotas))
1. Start creating a VM
In accordance with centron's terms of use, registering accounts for addresses in countries sanctioned by OFAC is prohibited.
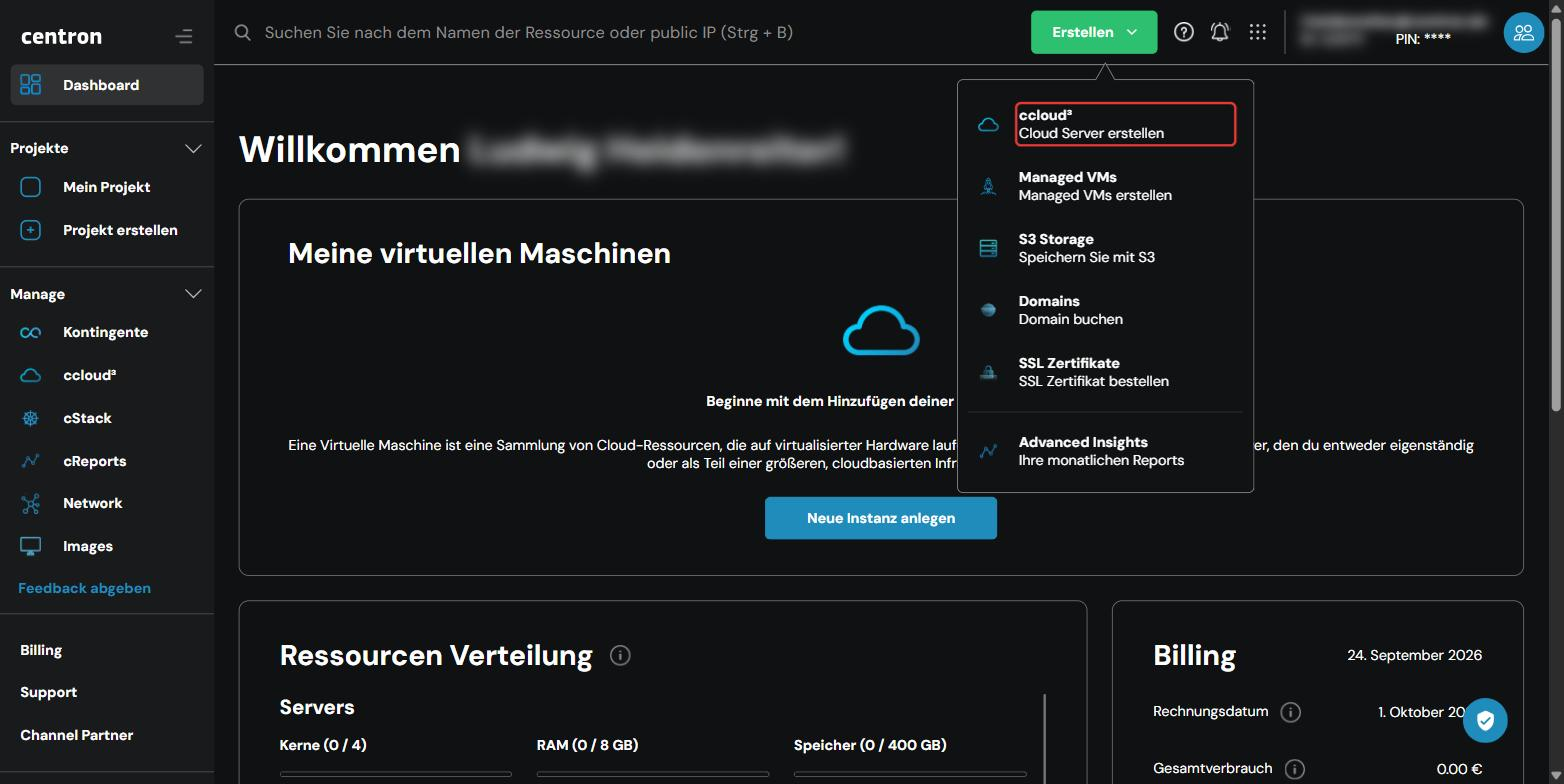
Click Erstellen (create) in the top right-hand corner and select ccloud³ – Cloud Server erstellen (create cloud server). Alternatively, click ccloud³ in the sidebar and then Neue Instanz erstellen (create new instance).
2. Configure the VM
Configure the following settings on the ccloud³ Virtual Machines page. The estimated price per month and per hour is updated continuously at the bottom of the screen. Current prices are listed in the ccloud³ VM price overview.
Server type
Choose the type of your server:
- Optimiertes Cloud Computing (optimised cloud computing): virtual machines with shared vCPU for business applications, e.g. production websites, CI/CD, web applications or larger databases.
- Cloud GPU: virtual machines with NVIDIA GPUs for AI, machine learning, HPC, visual computing and VDI.
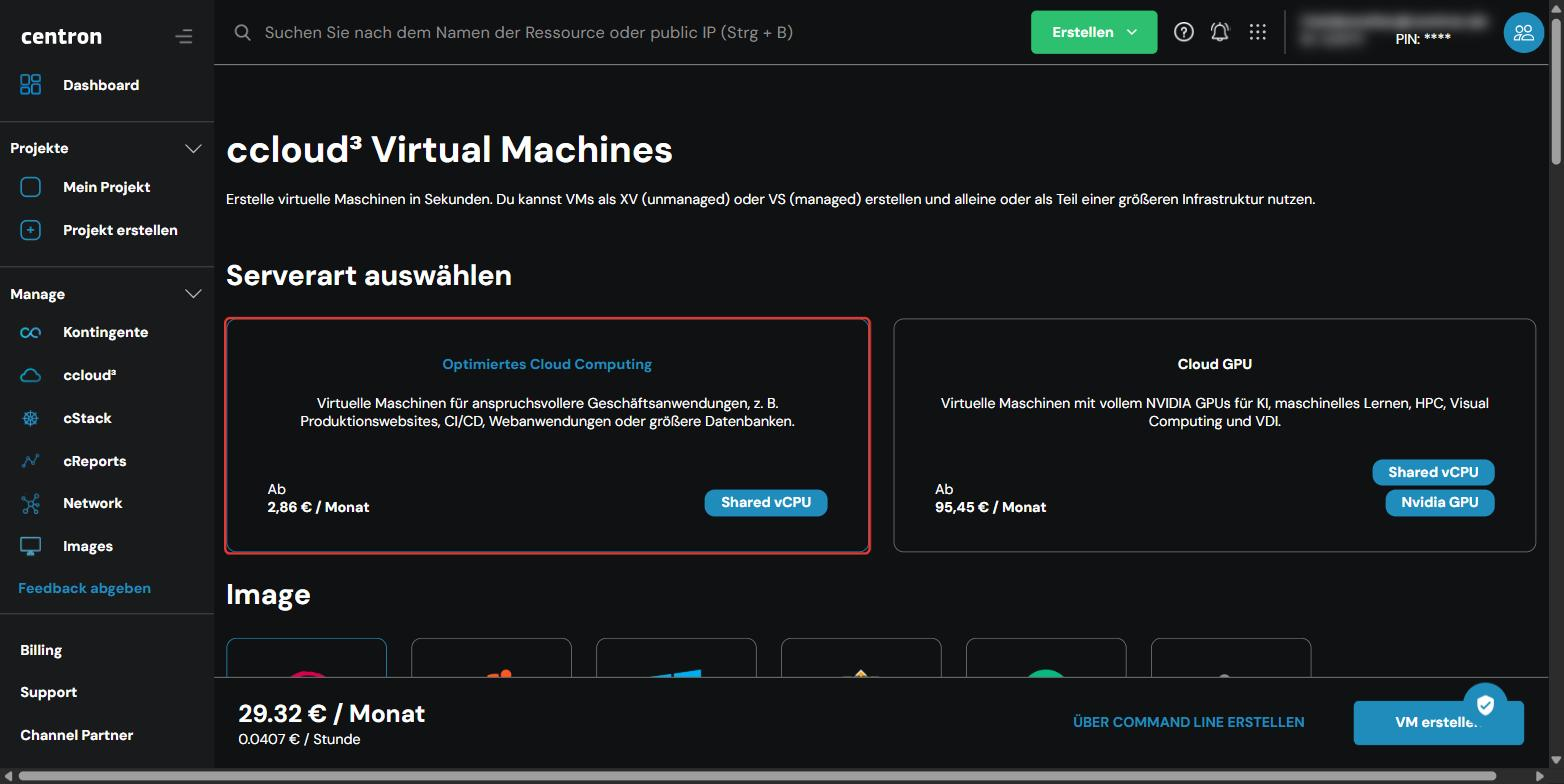
Image and version
Choose an operating system and the version you want. Debian, Ubuntu, Windows, CentOS and Rocky Linux are available. Windows incurs a licence surcharge, which is shown directly on the tile.
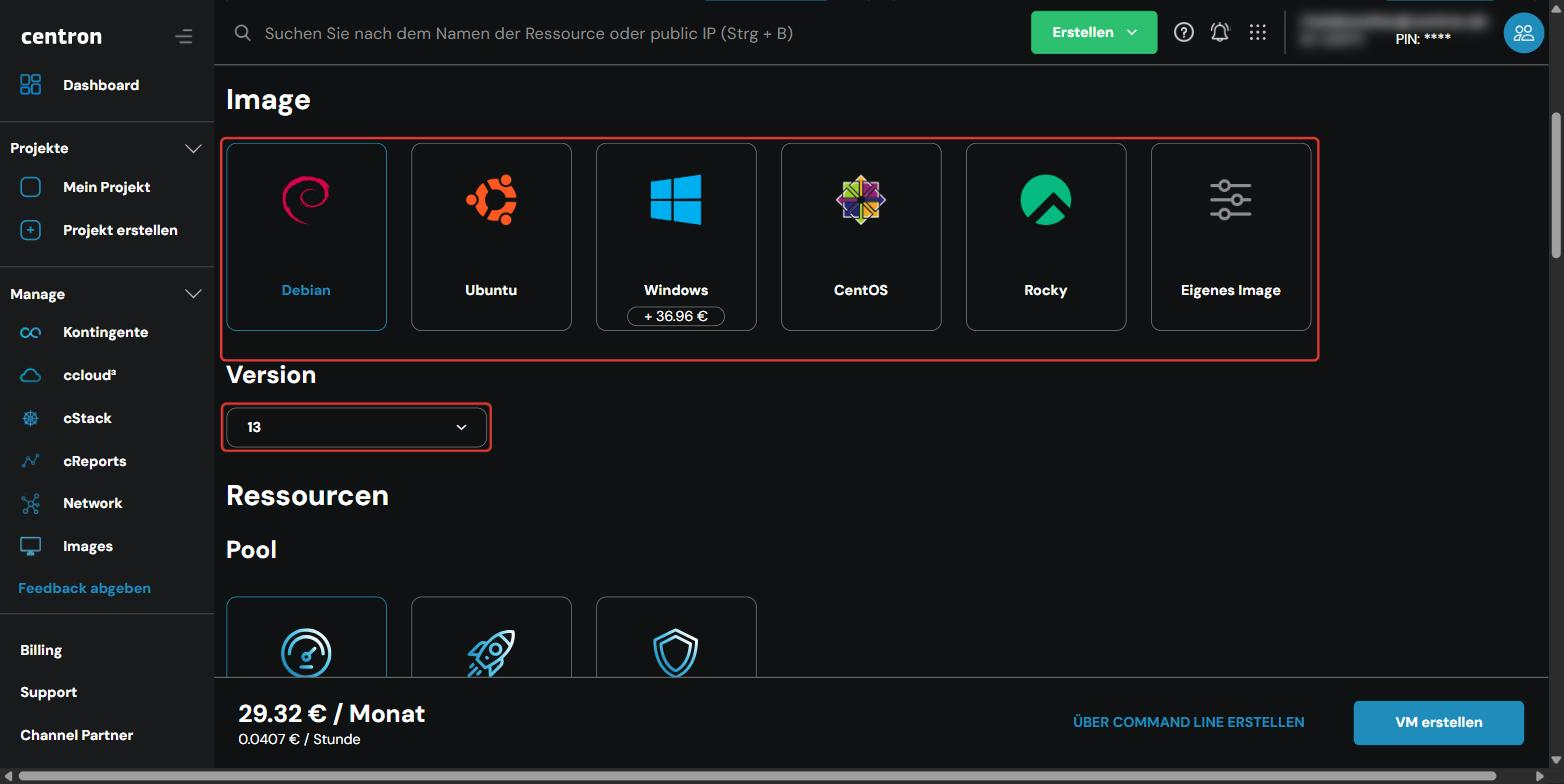
Select Eigenes Image (own image) if you want to use your own operating system image. Send the image to technik@centron.de. centron sets up an empty virtual machine for you. After the image has been checked, you can select it in the detail view of your VM in the DVD Laufwerk (DVD drive) tab.
Pool
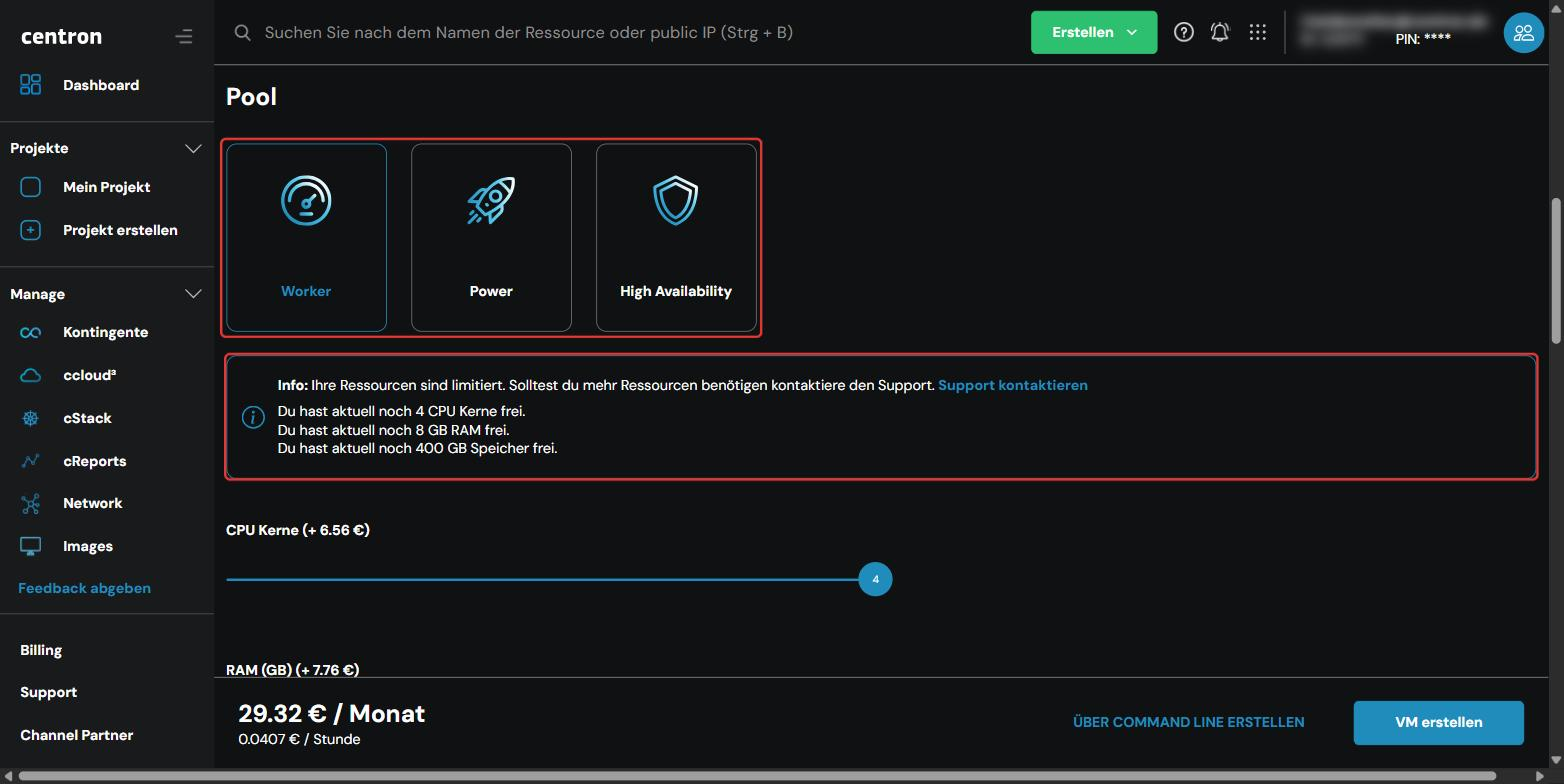
Under Ressourcen → Pool (resources → pool), choose a pool that meets your requirements:
| Pool | Clock speed | Availability | Recommended for |
|---|---|---|---|
| Worker | 2.7–3.4 GHz | 99.5% | SaaS, high-traffic servers, e-commerce |
| Power | 3.5 GHz guaranteed | 99.5% | Streaming, analytics, batch processing |
| High Availability | 3.5 GHz, real-time replication on two systems | 99.8% | Business-critical applications requiring high resilience |
Availability is the monthly availability as stated in the ccloud³ service specification.
Below the pools, you can see how many CPU cores, how much RAM and how much storage are still free in your quota.
Resources
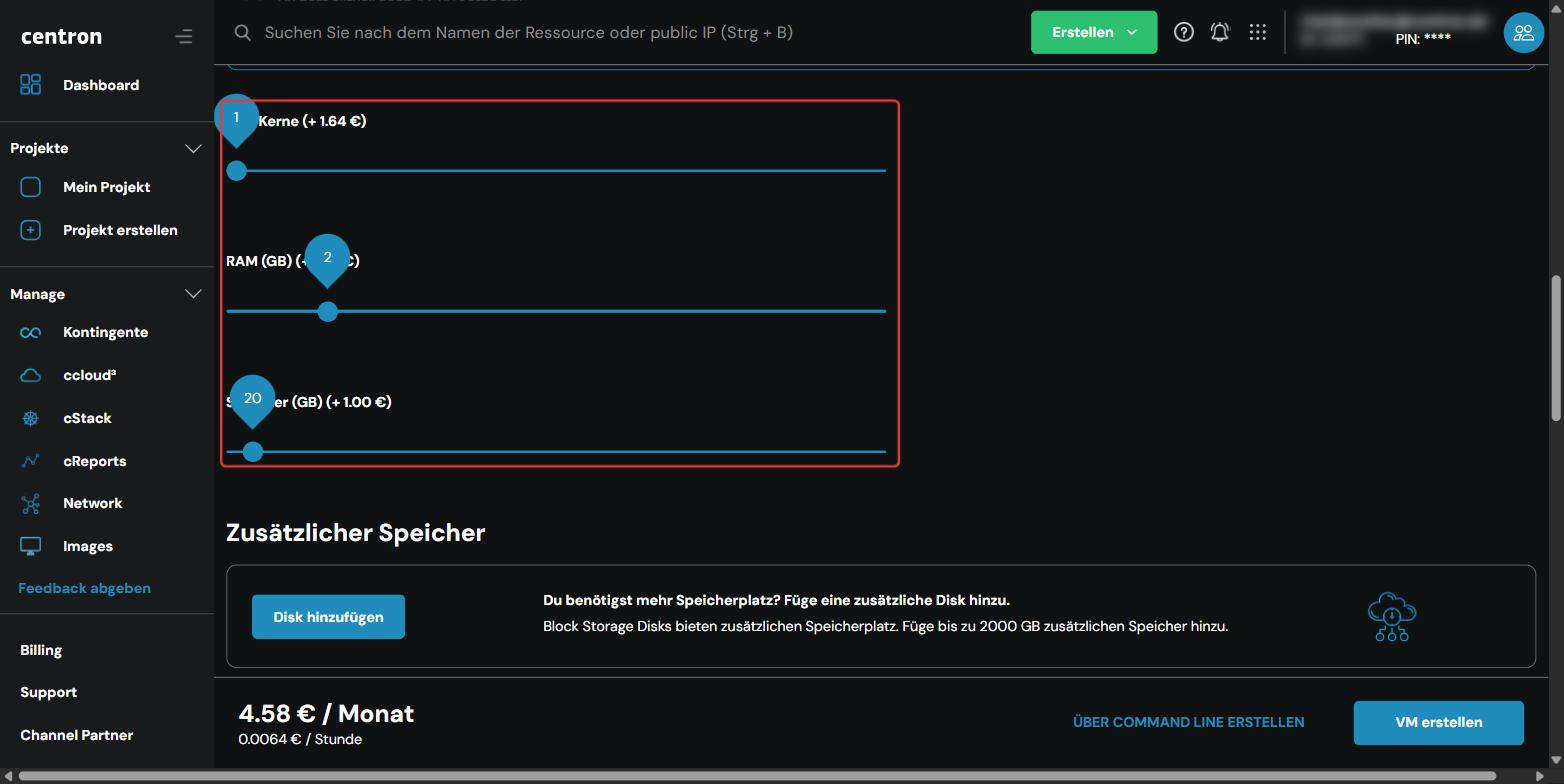
Use the sliders to set the resources of your VM:
- CPU Kerne (CPU cores): number of vCPUs, from 1 core in steps of 1.
- RAM (GB): size of the memory, from 1 GB in steps of 1 GB.
- Speicher (GB) (storage): size of the system disk, from 10 GB in steps of 5 GB. Local storage is provided as SSD storage.
The maximum of each slider corresponds to the free resources in your quota. You can adjust the resources after provisioning via Größe ändern (resize).
If you have higher resource requirements, please contact your account manager or centron support.
Additional storage (optional)
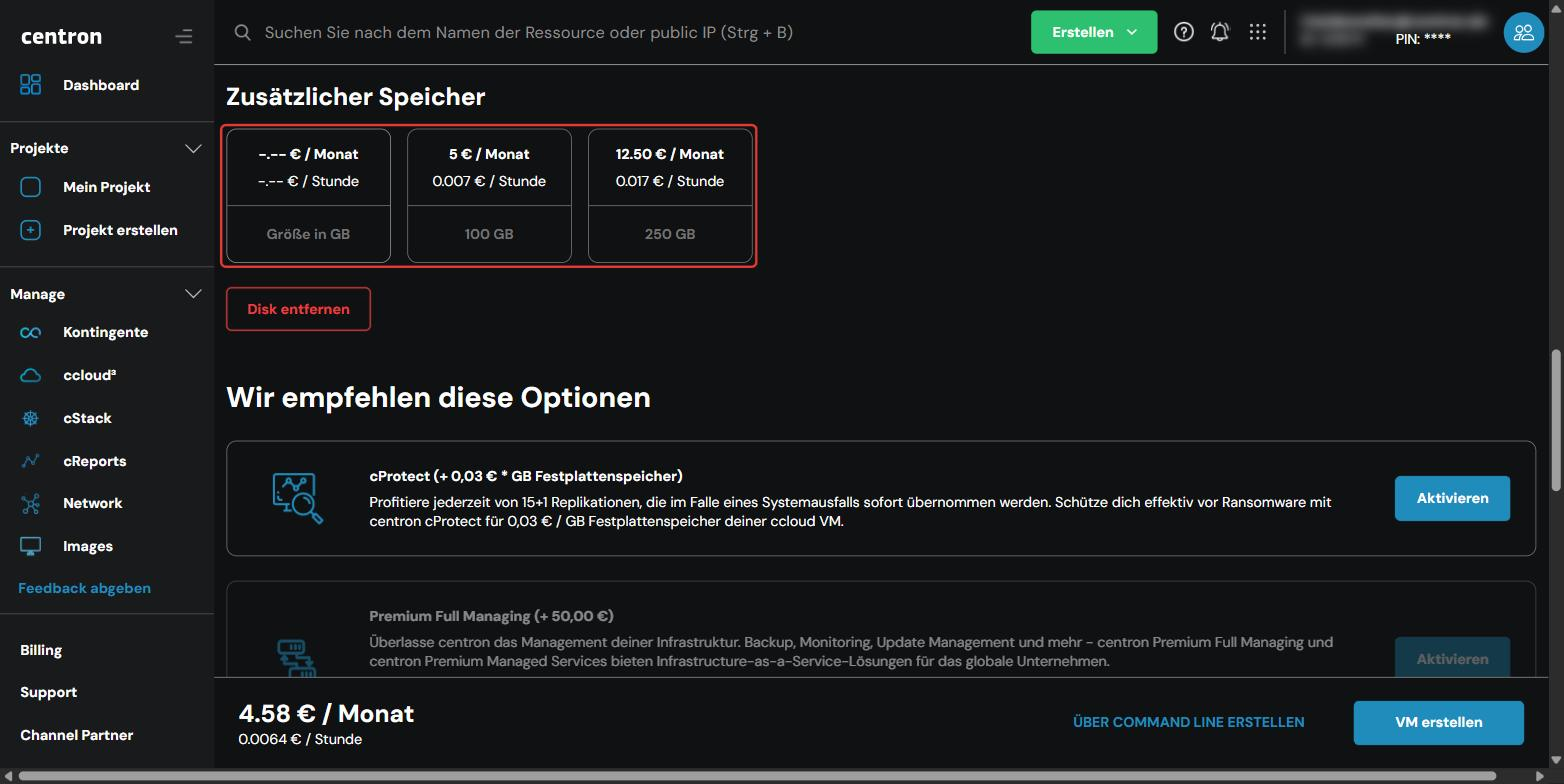
Click Disk hinzufügen (add disk) to add an additional block storage disk to your VM. You can choose one of the suggested sizes or enter your own size under Größe in GB (size in GB). A total of up to 2000 GB of additional storage is possible. Disk entfernen (remove disk) undoes the selection.
Recommended options (optional)
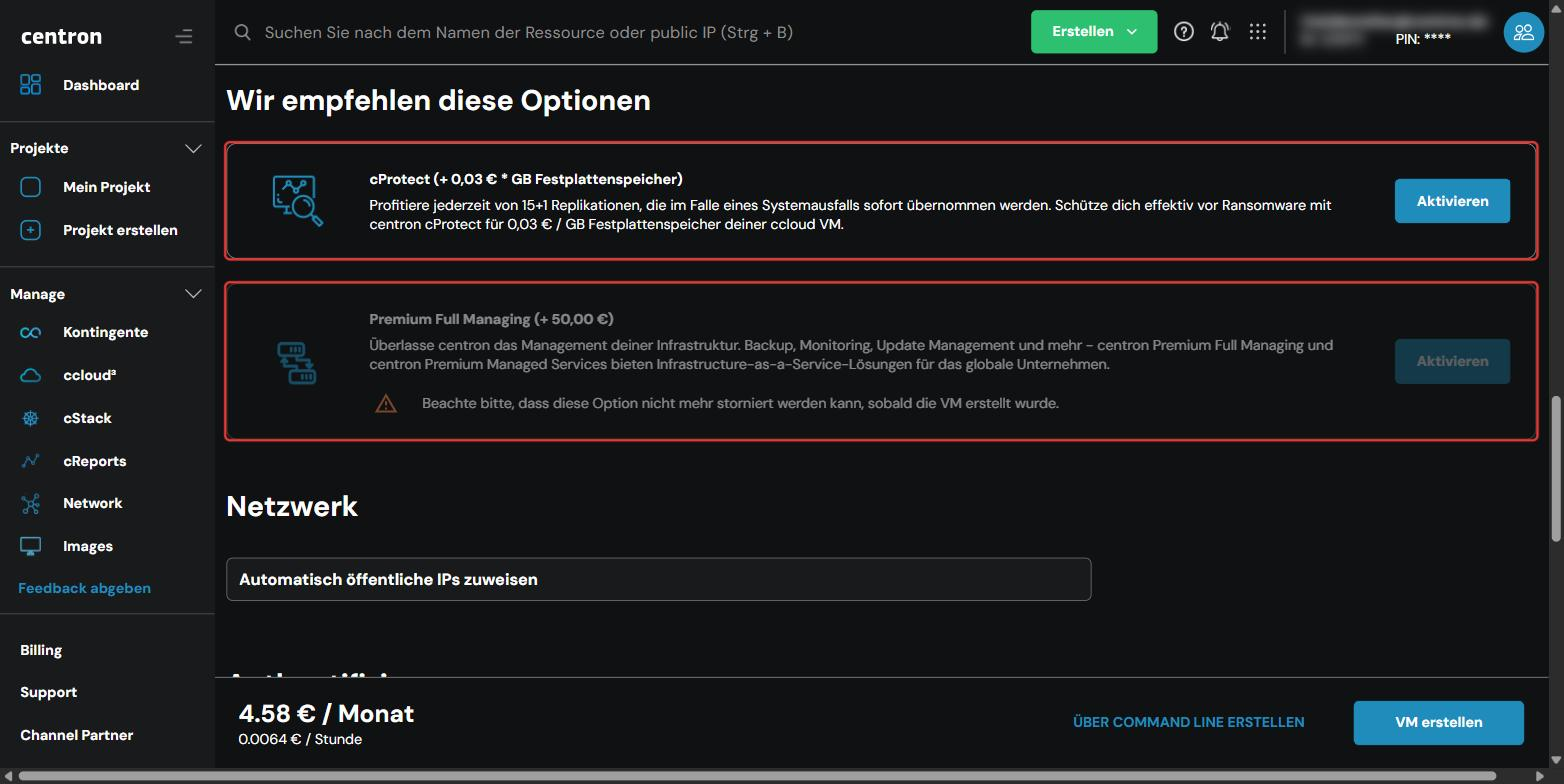
- cProtect: replication of your VM that can take over immediately in the event of a system failure, plus protection against ransomware. The cost depends on the size of the disk storage. Click Aktivieren (enable) to add cProtect.
- Premium Full Managing: centron manages your VM, including backup, monitoring and update management. This option is only available on request; please contact centron support. Premium Full Managing can no longer be cancelled once the VM has been created.
Network and authentication
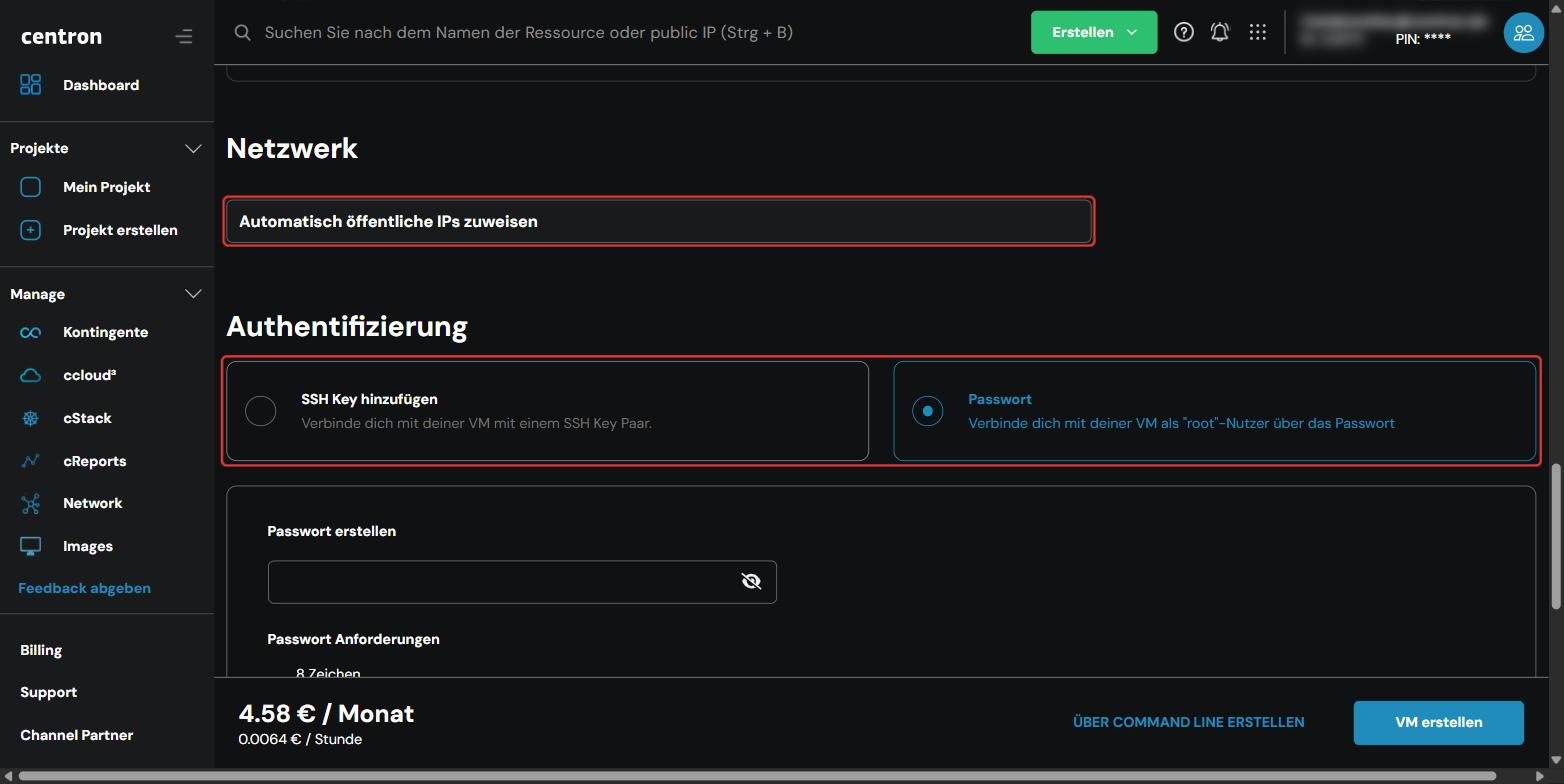
Netzwerk (network): Automatisch öffentliche IPs zuweisen (assign public IPs automatically) is selected by default. If you have already created a VPC, you can search for its name or IP in the search field and place the VM in it.
Authentifizierung (authentication): choose how you want to connect to your VM:
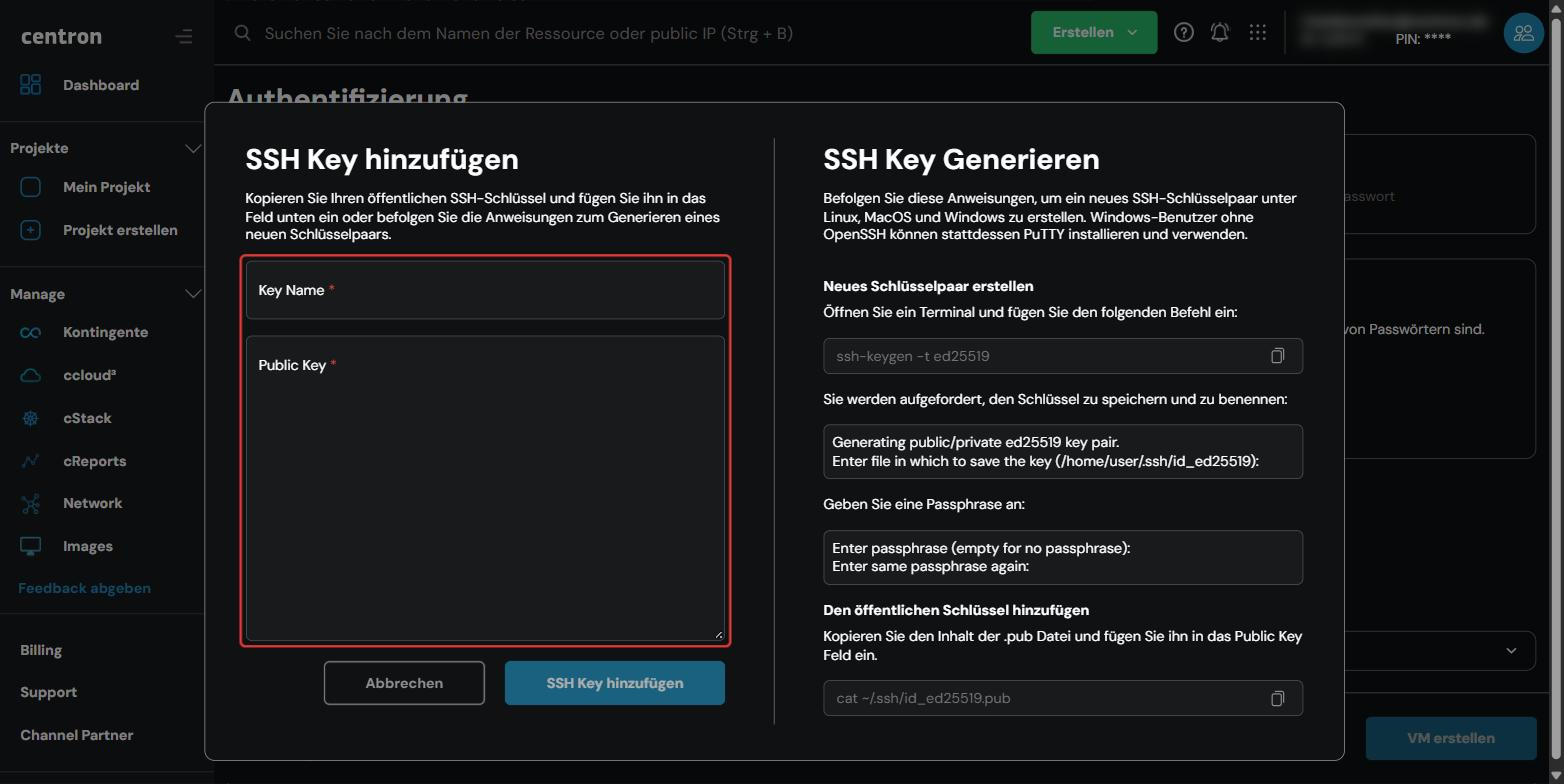
- SSH Key hinzufügen (add SSH key): sign in with an SSH key pair.
- Passwort (password): sign in as user
rootwith a password.
Add an SSH key
Click SSH Key hinzufügen to add a new public key. In the dialog, enter a Key Name and paste your Public Key. On the right-hand side of the dialog, you will find instructions on how to generate a new key pair with ssh-keygen -t ed25519. (Verwalten) (manage) takes you to the SSH keys you have already added.
Password
Enter a secure password under Passwort erstellen (create password). The password must be at least 8 characters long and contain at least one upper-case letter, one lower-case letter, one number and one special character. If you leave the field empty, a random password is generated.
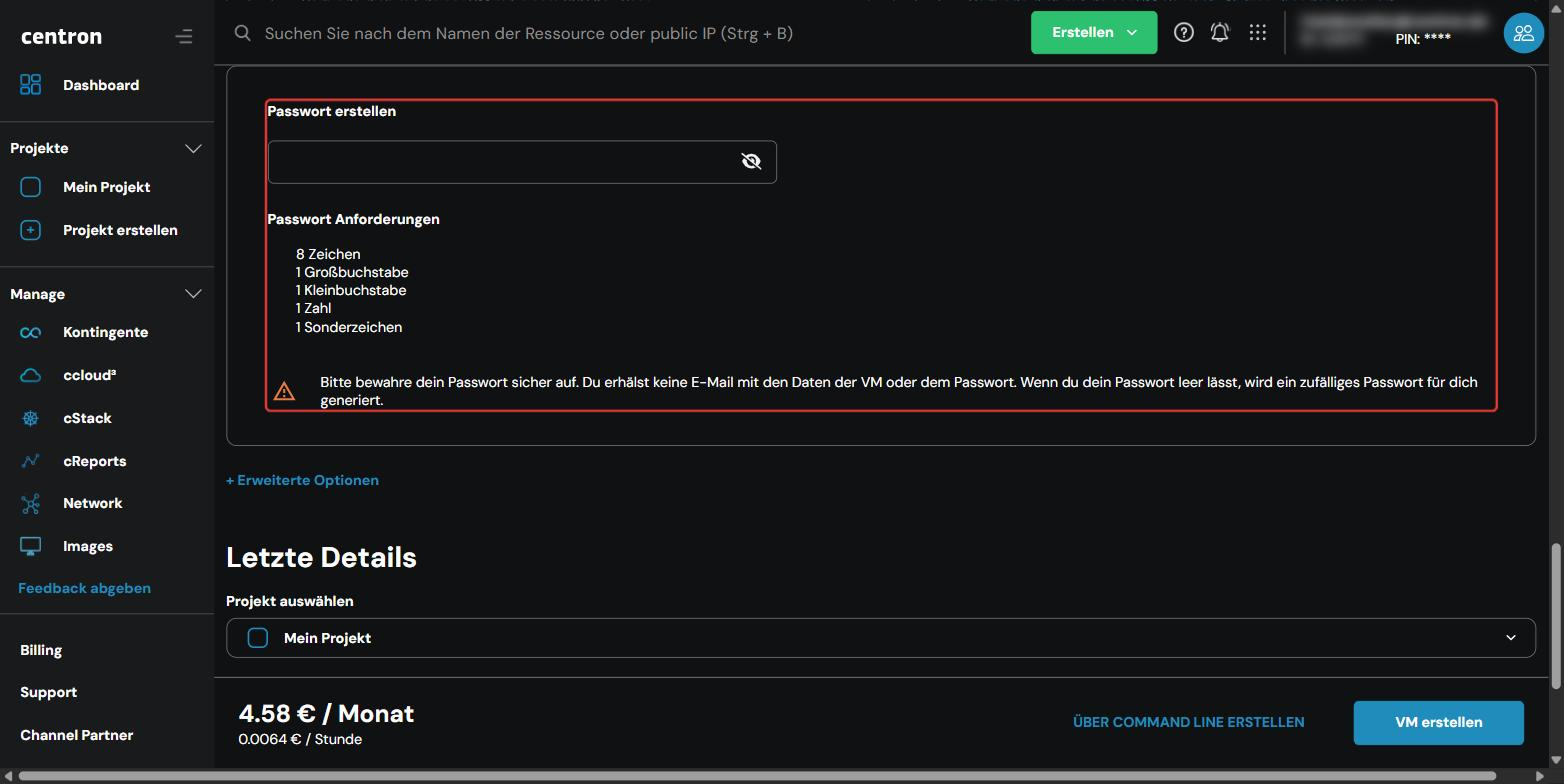
Keep your password in a safe place. You will not receive an email with the VM data or the password.
Advanced options (optional)
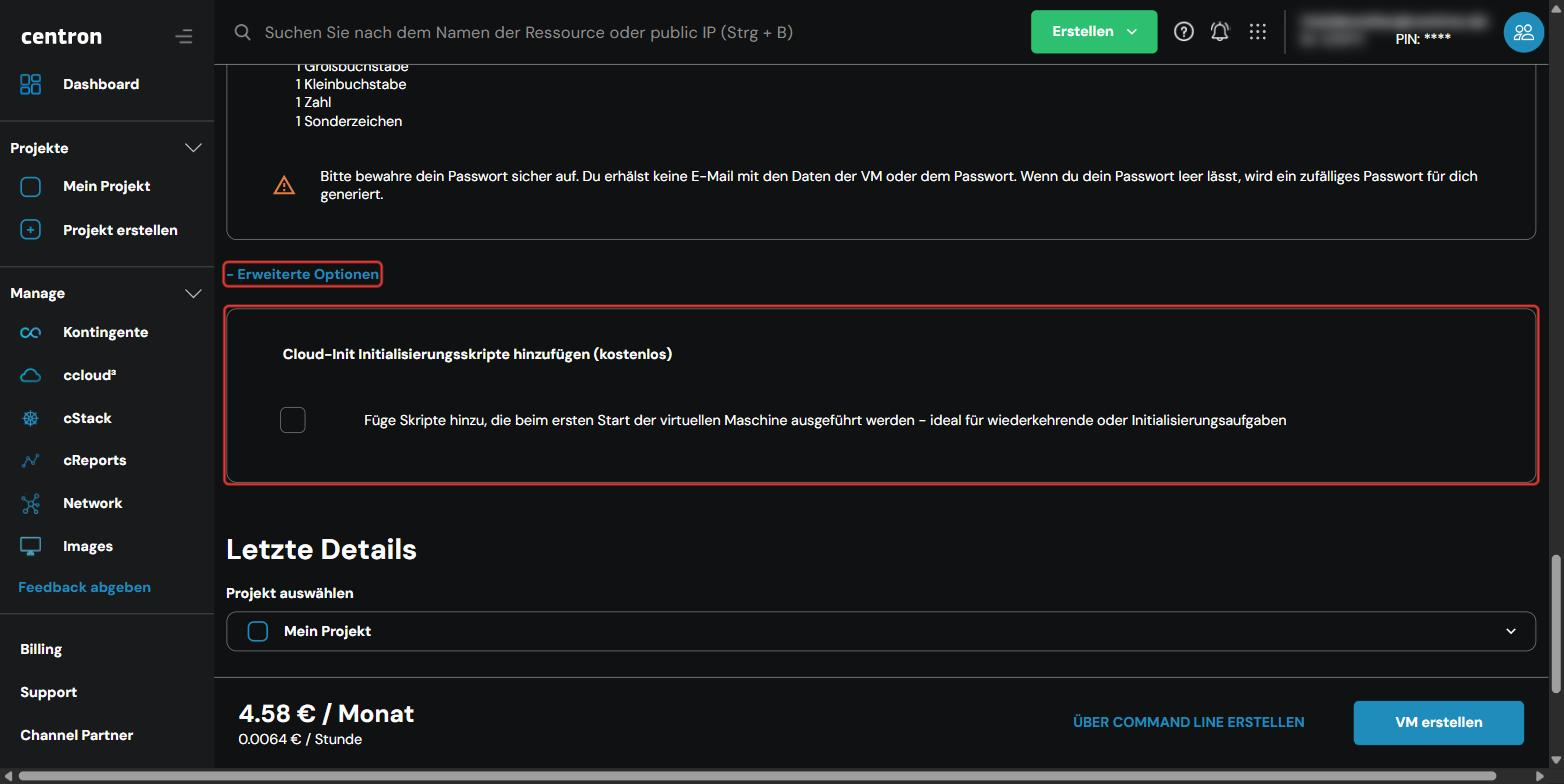
Click + Erweiterte Optionen (advanced options) to add cloud-init initialisation scripts. These scripts run the first time the VM starts and are suitable for recurring or initialisation tasks. The option is free of charge. For more information, see Automate VM setup with cloud-init.
Final details
- Projekt auswählen (select project): choose the project to which the VM is assigned.
- Name: give your VM a name so that you can identify it more easily later.
- Tags (optional): enter a tag and click Tag hinzufügen (add tag). You can use tags to filter your VMs in the server overview.
Finally, click VM erstellen (create VM).
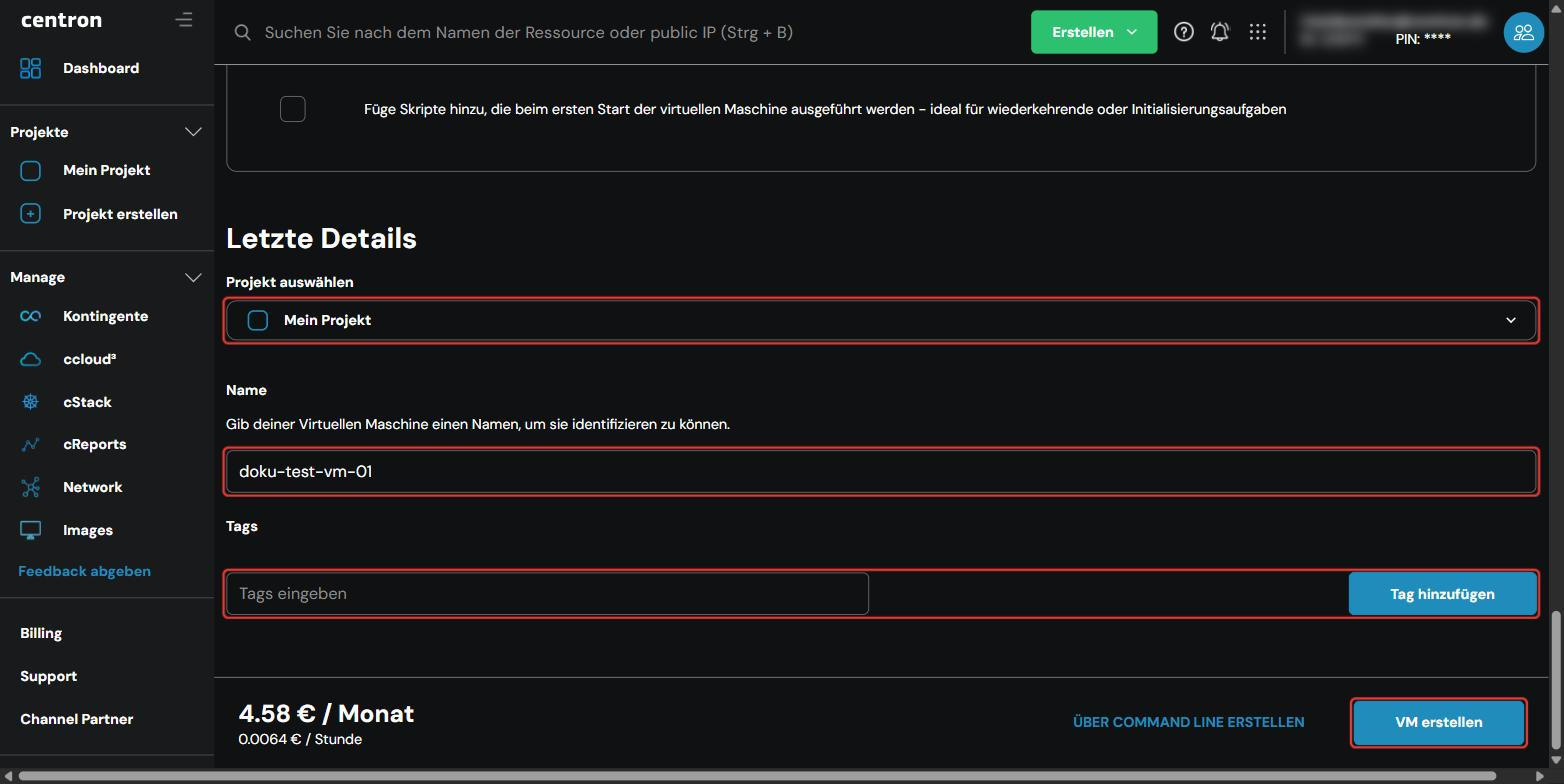
Über Command Line erstellen (create via command line) gives you a ready-made curl command with your current configuration, which you can use to create the VM via the API. Replace <Token> with your API token.
3. Wait for provisioning
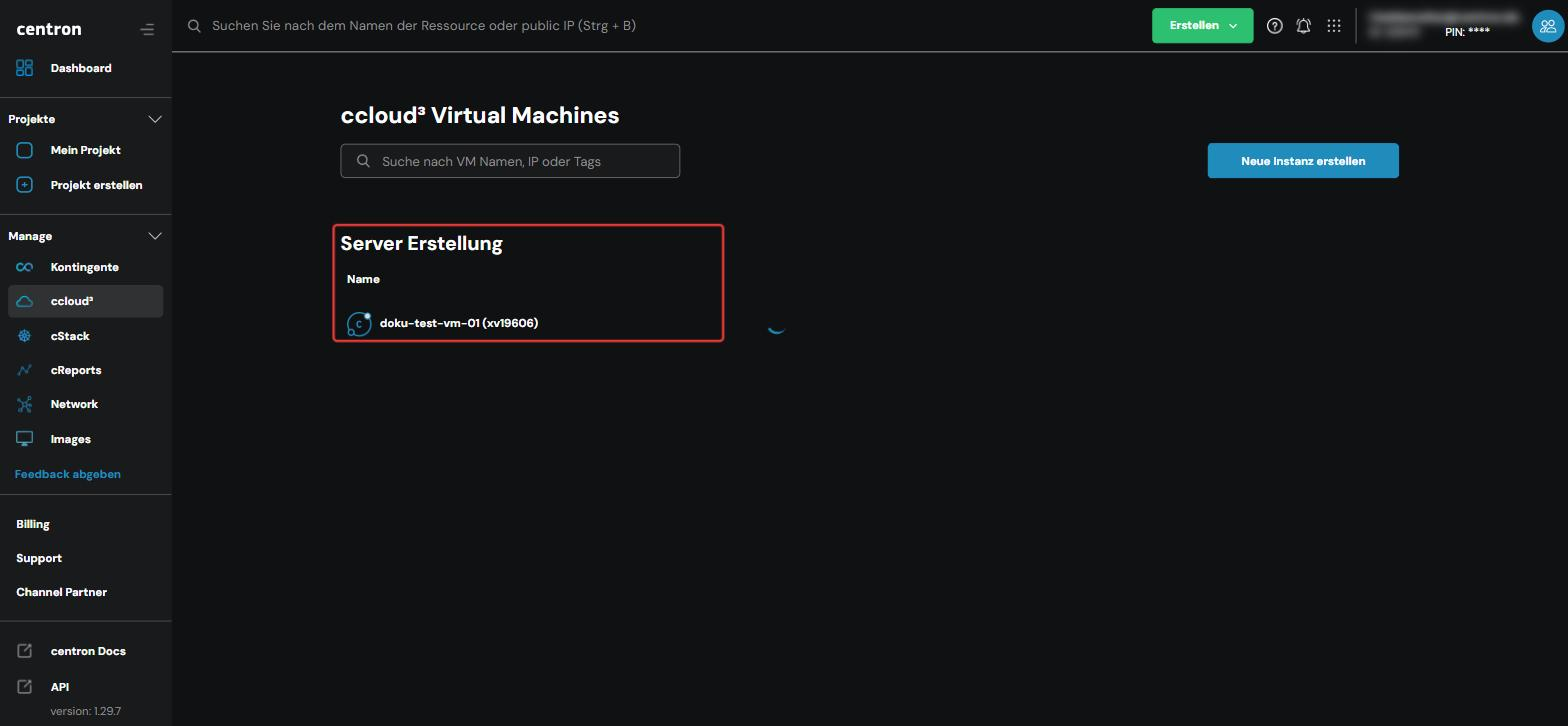
You are redirected to the server overview. Your VM is shown there under Server Erstellung (server creation) until provisioning is complete. This usually takes a few minutes.
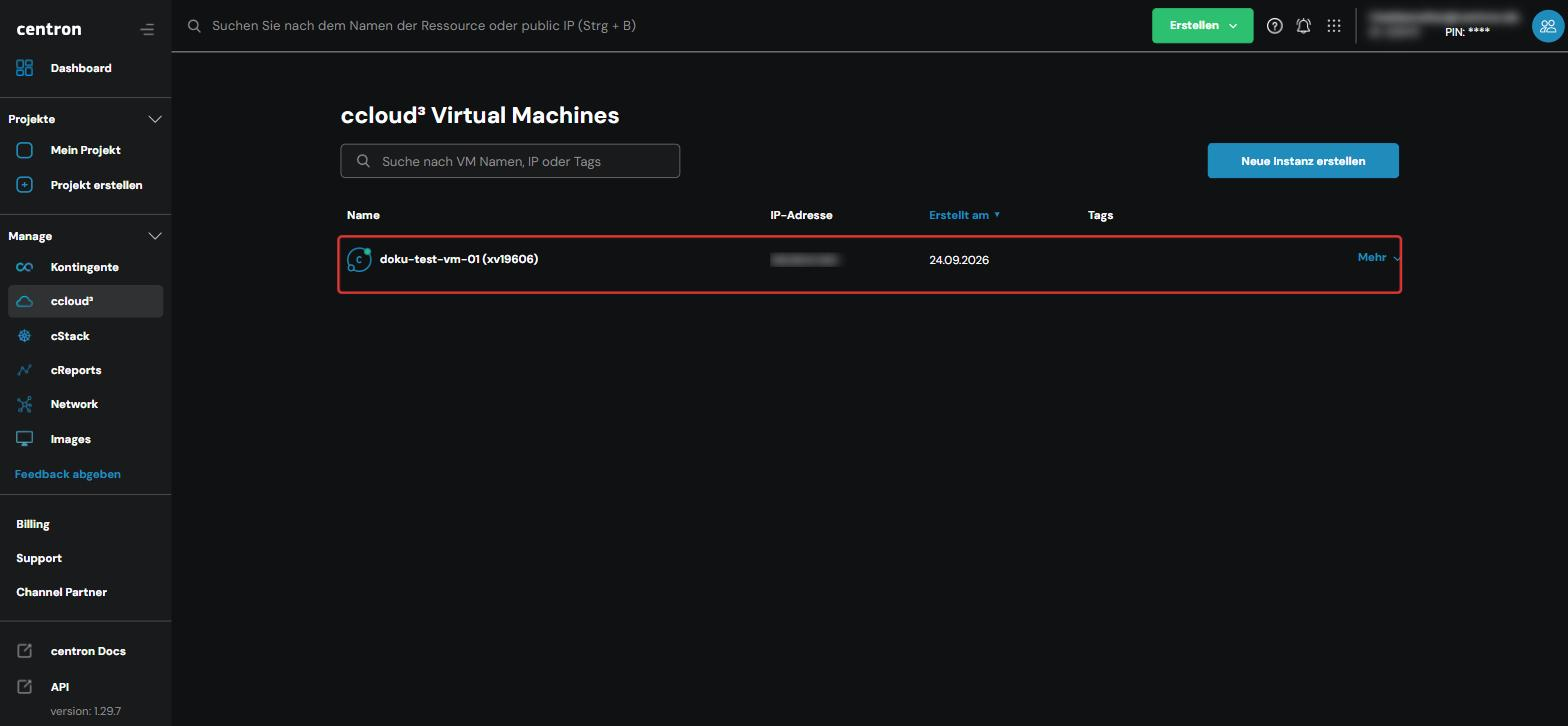
As soon as the VM is ready, it appears in the ccloud³ Virtual Machines list with its IP address.
Start, stop, reset or destroy a VM
The allocated resources remain reserved for your VM as long as it exists. For this reason, servers that are switched off continue to incur costs.
Destroy virtual machines that you no longer need in the ccloud³ interface. Only then are the resources released completely and billing stopped.
All actions are available in two ways:
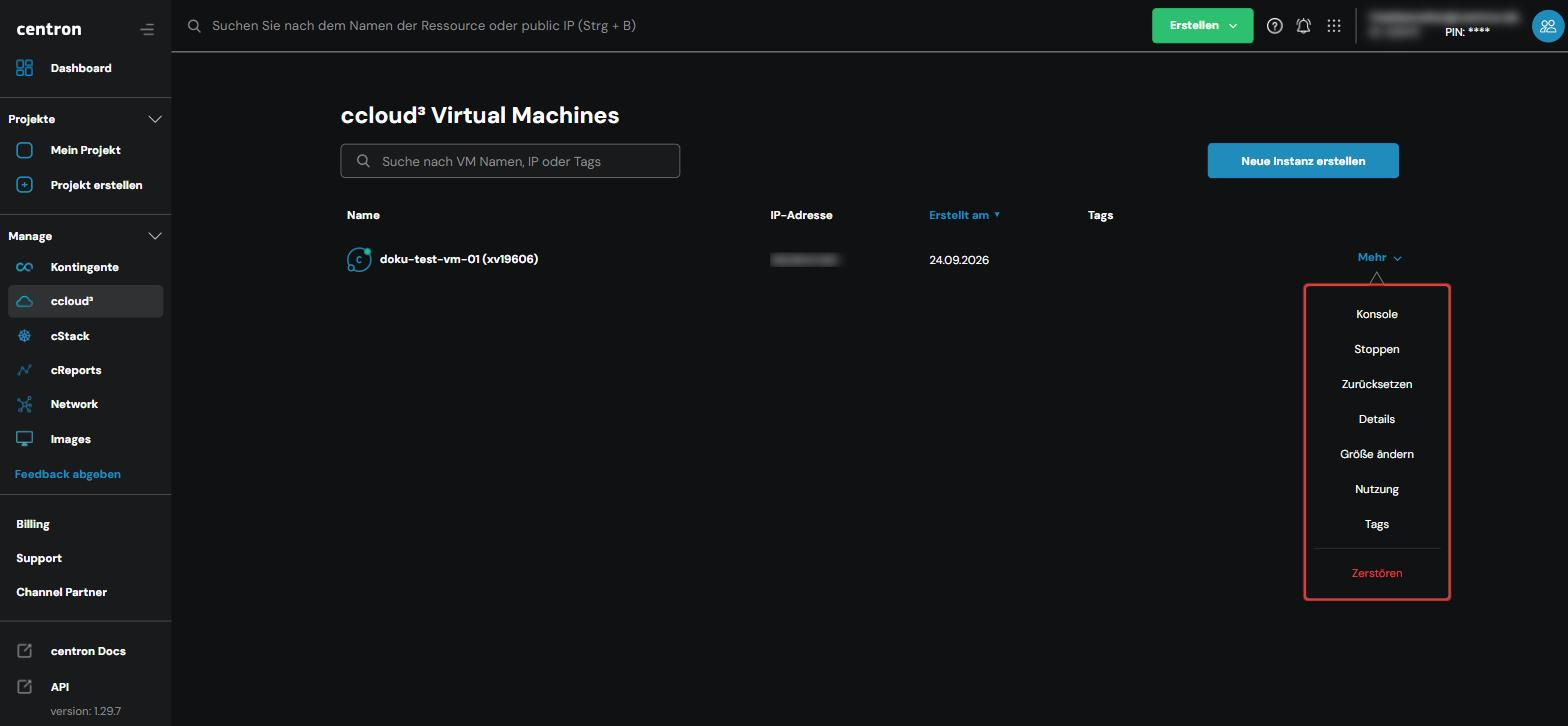
- Server overview: click Mehr (more) in the row of your VM. Depending on the status, the menu contains Konsole (console), Starten (start) or Stoppen (stop), Zurücksetzen (reset), Details, Größe ändern (resize), Nutzung (usage), Tags and Zerstören (destroy).
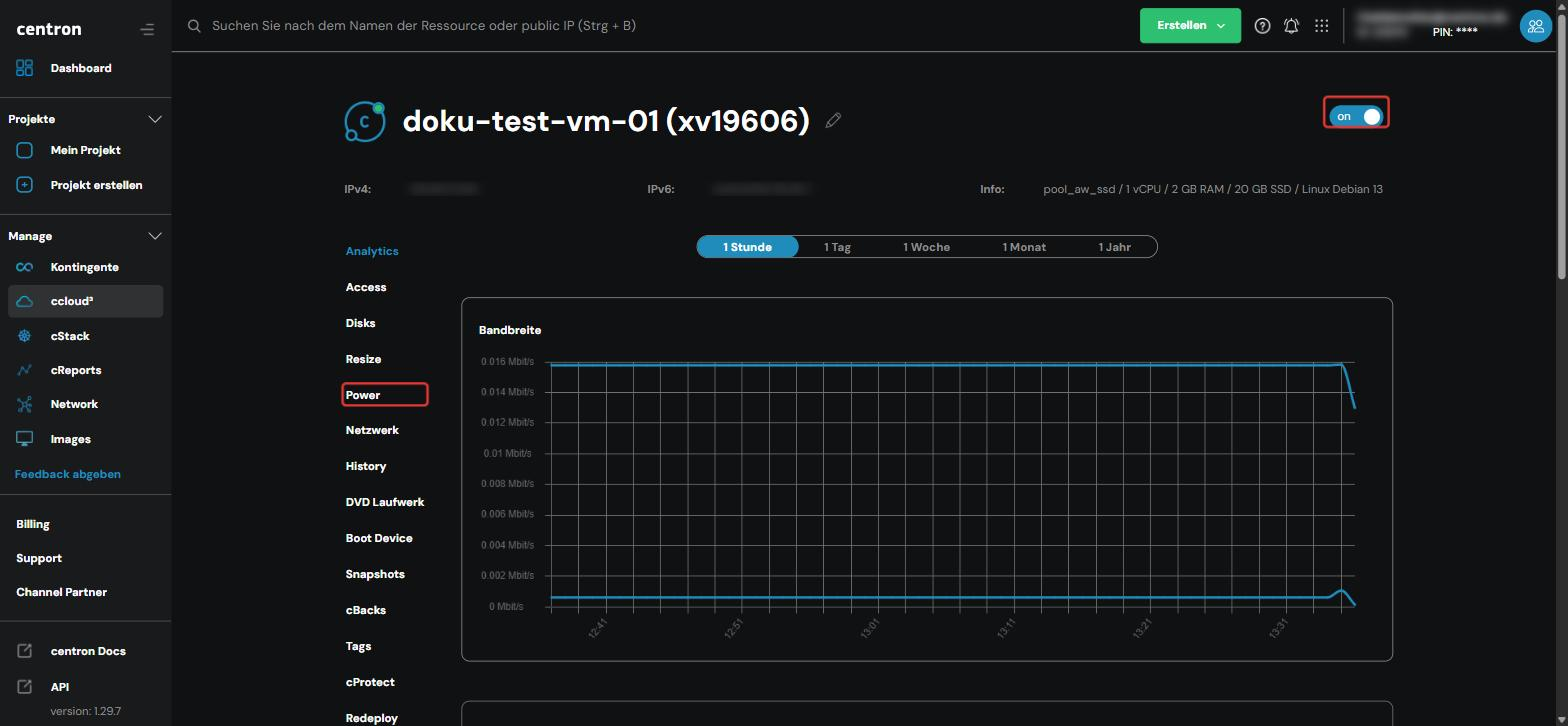
- Detail view: click the name of the VM or Mehr → Details. In the top right-hand corner you will find the on/off switch; the left-hand navigation contains the sections Power and Zerstören, among others.
Stop a VM
-
Open the detail view of the VM you want to stop.
-
(Optional) Connect via the console and shut down the VM at operating system level to avoid data loss.
-
Set the switch in the top right-hand corner to off.
-
Confirm the dialog Herunterfahren deiner virtuellen Maschine (shut down your virtual machine) with Herunterfahren (shut down). The VM is shut down via the guest operating system.
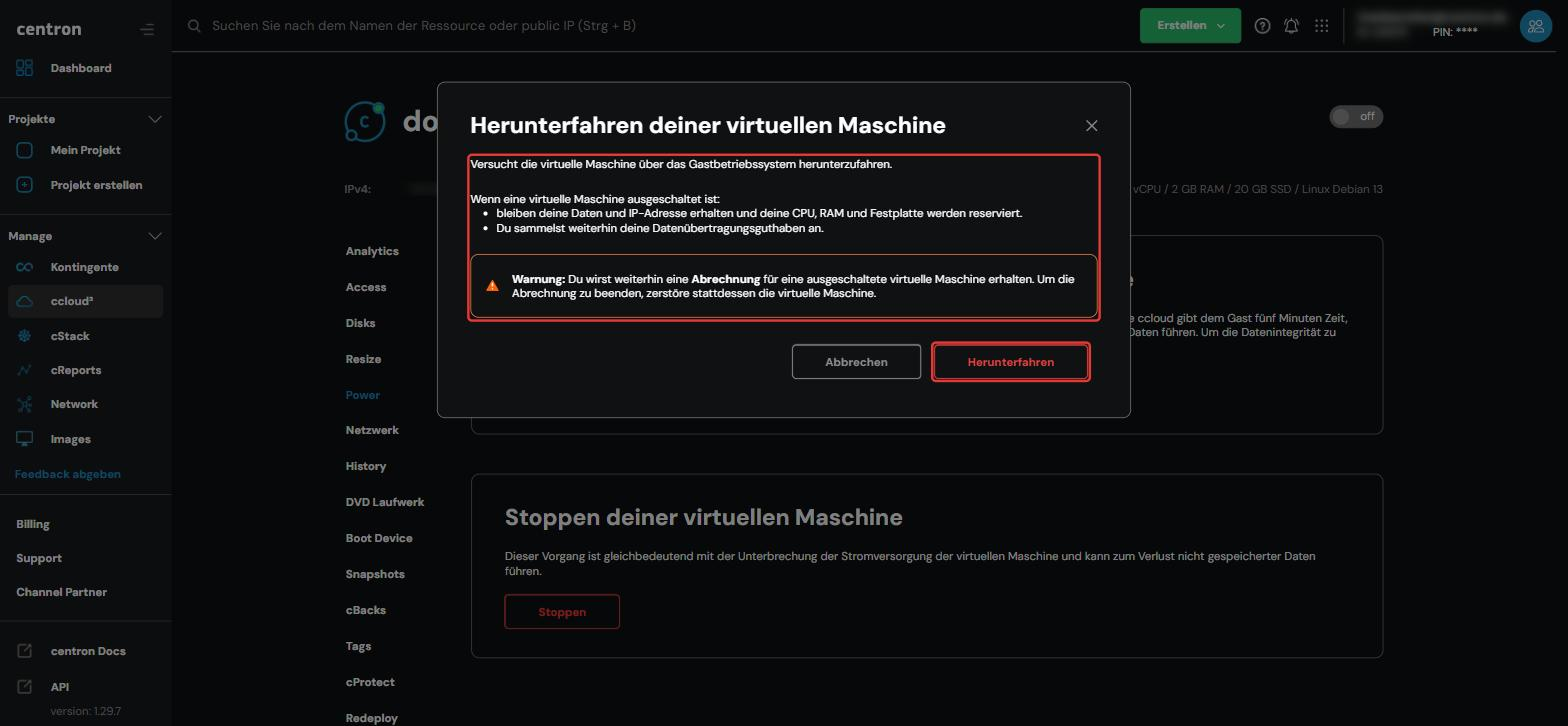
The data and the IP address of your VM are retained. CPU, RAM and disk remain reserved and continue to be billed.
In the Power section of the detail view, two further options are available:
- Erzwungenes Herunterfahren (forced shutdown): the VM is shut down via the guest operating system. ccloud³ gives the guest operating system five minutes to save data and then forces the shutdown.
- Stoppen (stop): equivalent to disconnecting the power supply. Unsaved data may be lost.
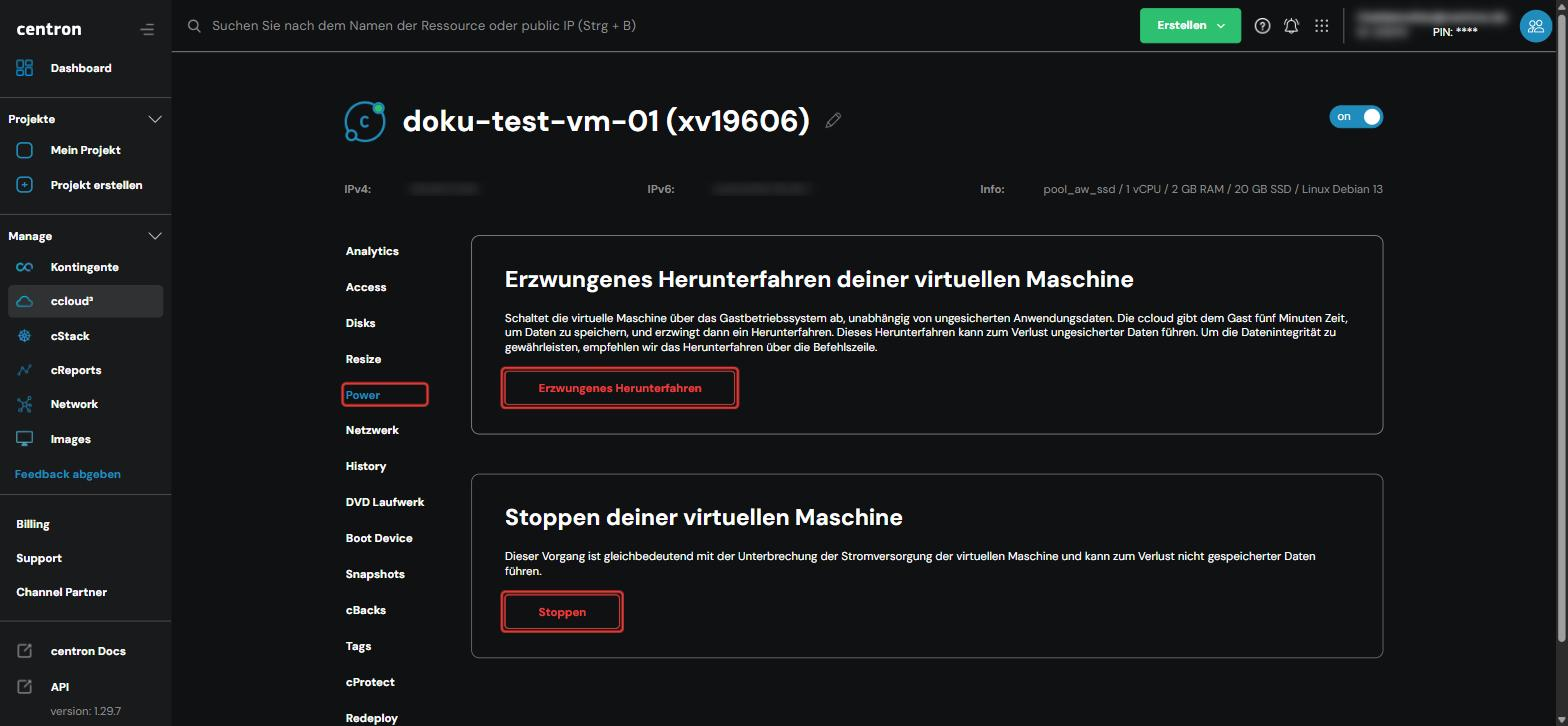
To ensure data integrity, we recommend shutting down the VM from the operating system's command line.
Start a VM
-
In the server overview, click Mehr → Starten in the row of the VM.
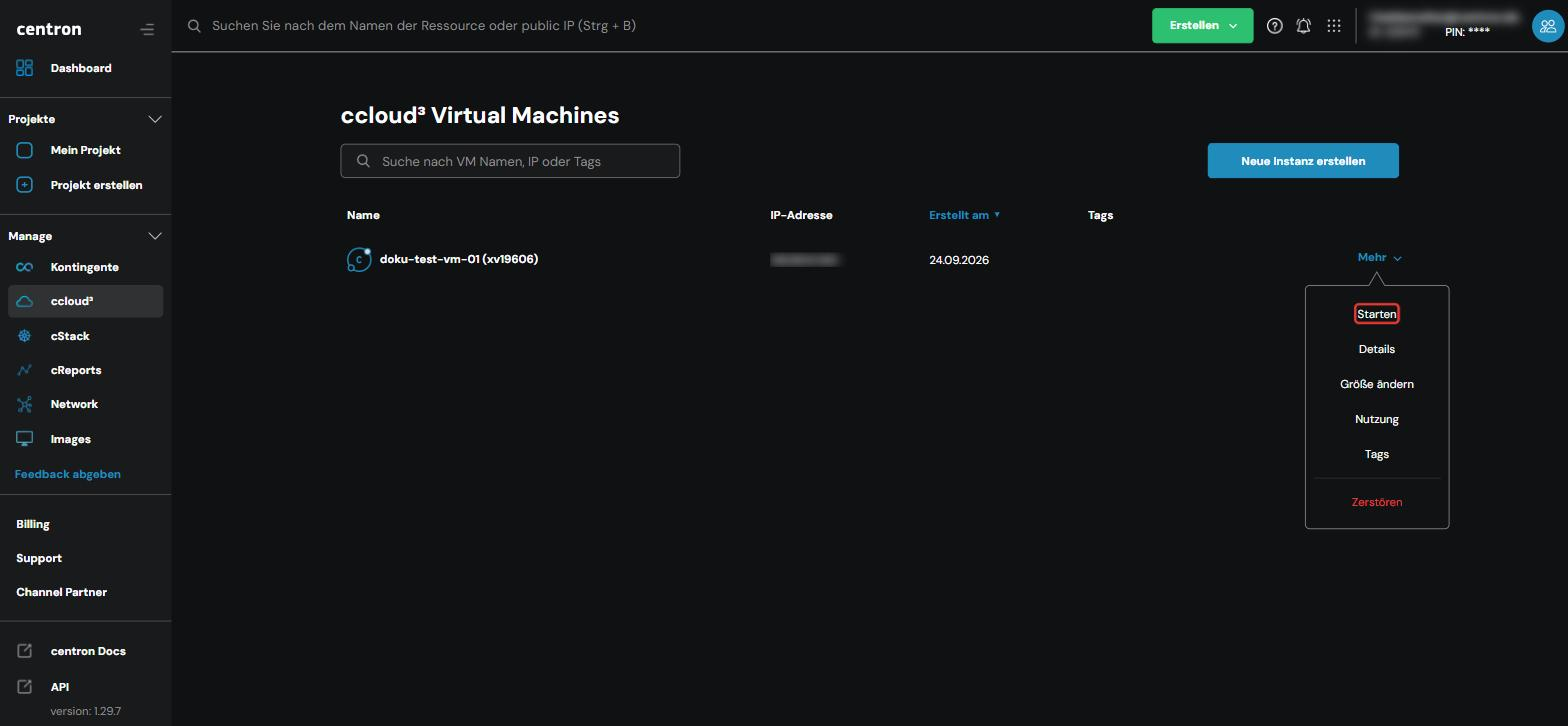
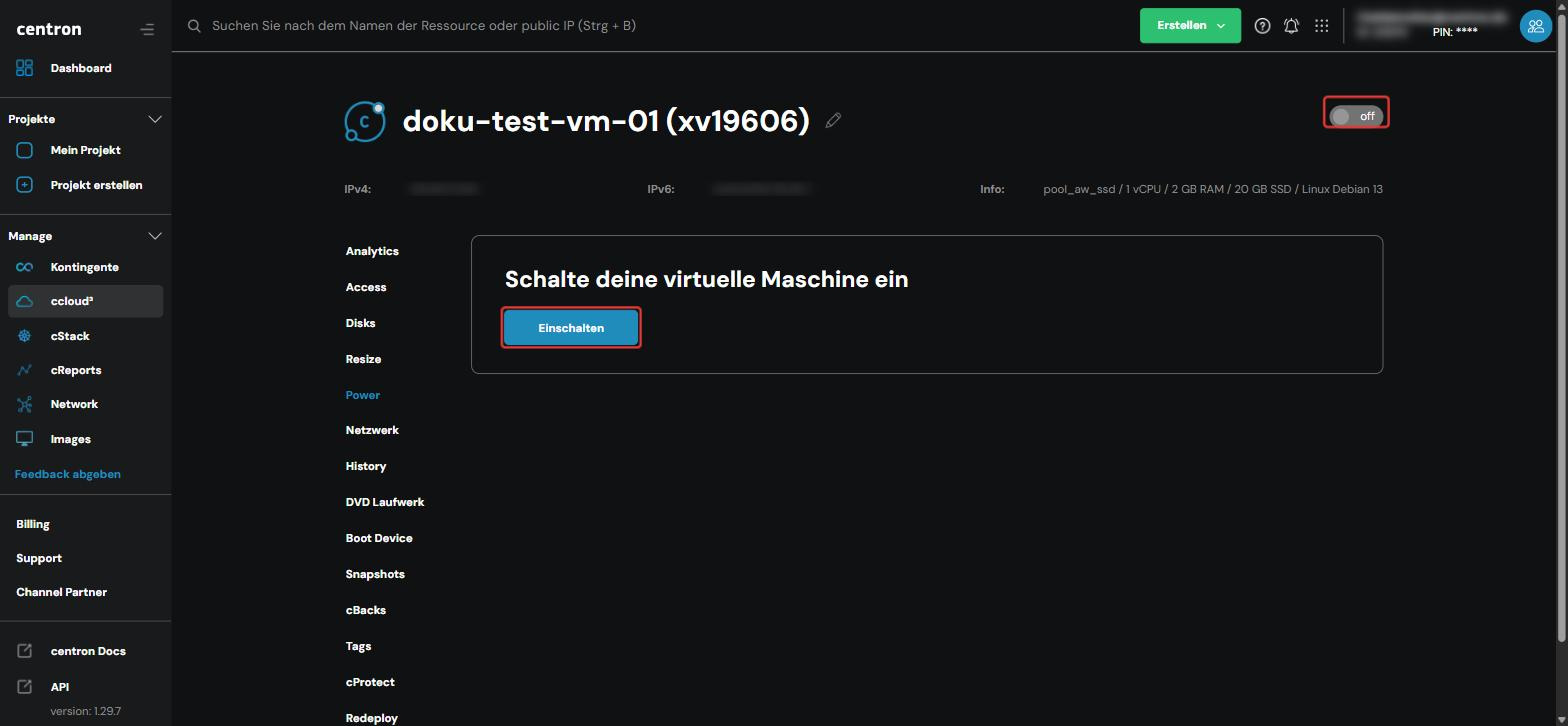
Alternatively, set the switch in the top right-hand corner of the detail view to on or click Einschalten (power on) in the Power section.
-
The VM boots without further confirmation. It keeps its previous IP address.
Reset a VM
- In the server overview, click Mehr → Zurücksetzen in the row of the VM.
- The VM is restarted immediately without further confirmation (hard reset). Unsaved data may be lost because the operating system is not shut down properly.
Destroy a VM
-
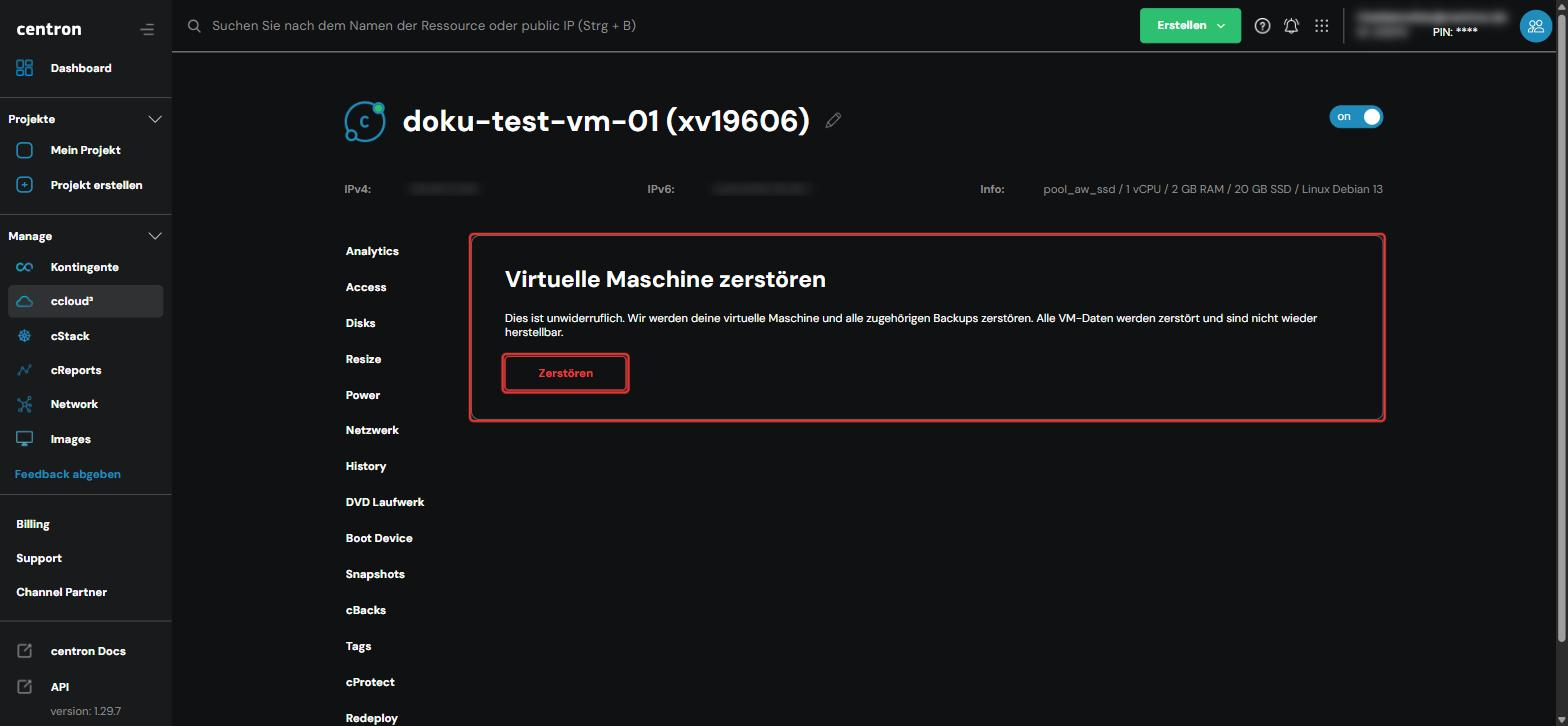
In the server overview, click Mehr → Zerstören in the row of the VM. Alternatively, select Zerstören in the left-hand navigation of the detail view.
-
In the Virtuelle Maschine zerstören (destroy virtual machine) section, click Zerstören.
-
In the confirmation dialog, enter the server ID of your VM (e.g.
xv12345). The ID is shown above the input field and can be copied using the copy icon. -
Click Zerstören.
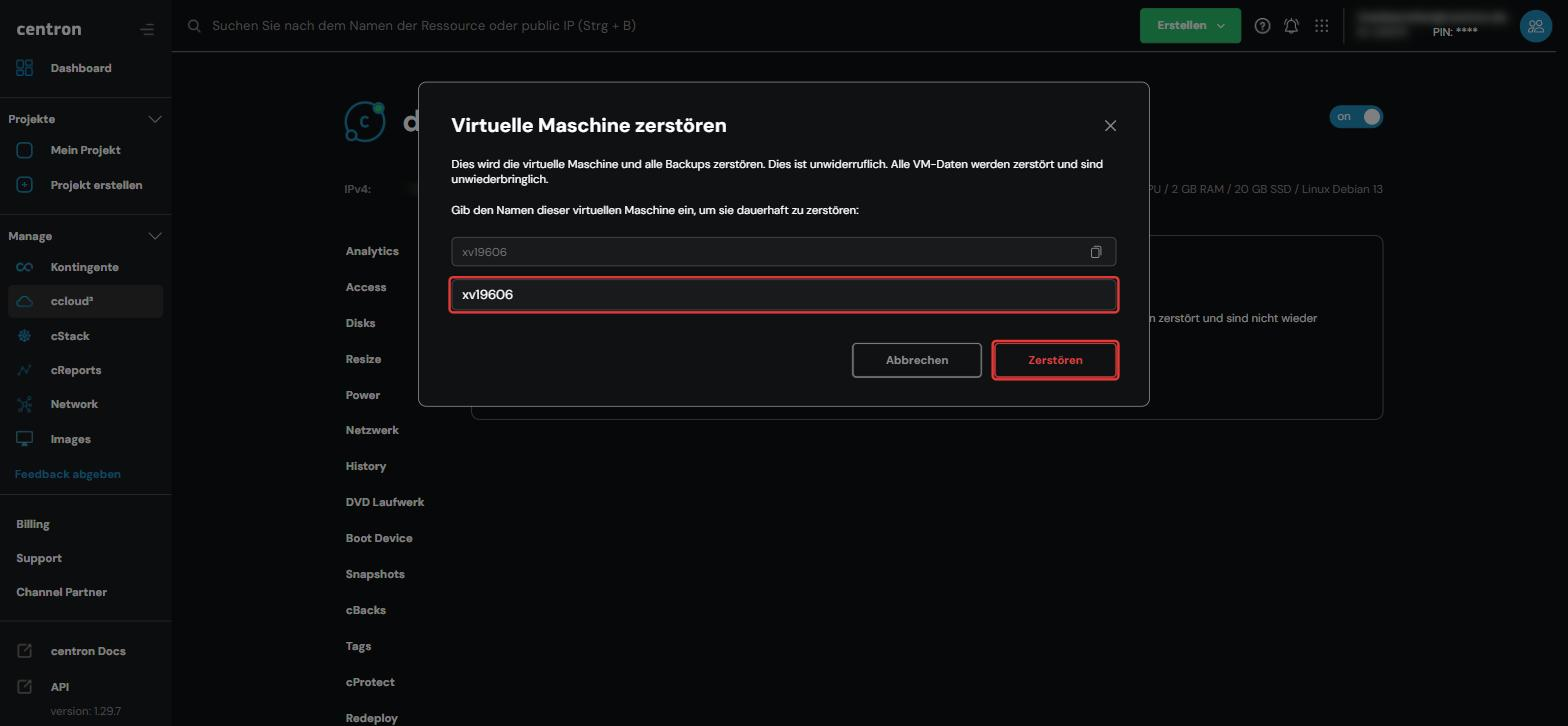
The VM, its storage and all associated backups are deleted. Billing for this VM stops and the resources become available in your quota again.
Destroying a VM is irreversible. All VM data is deleted and cannot be restored.